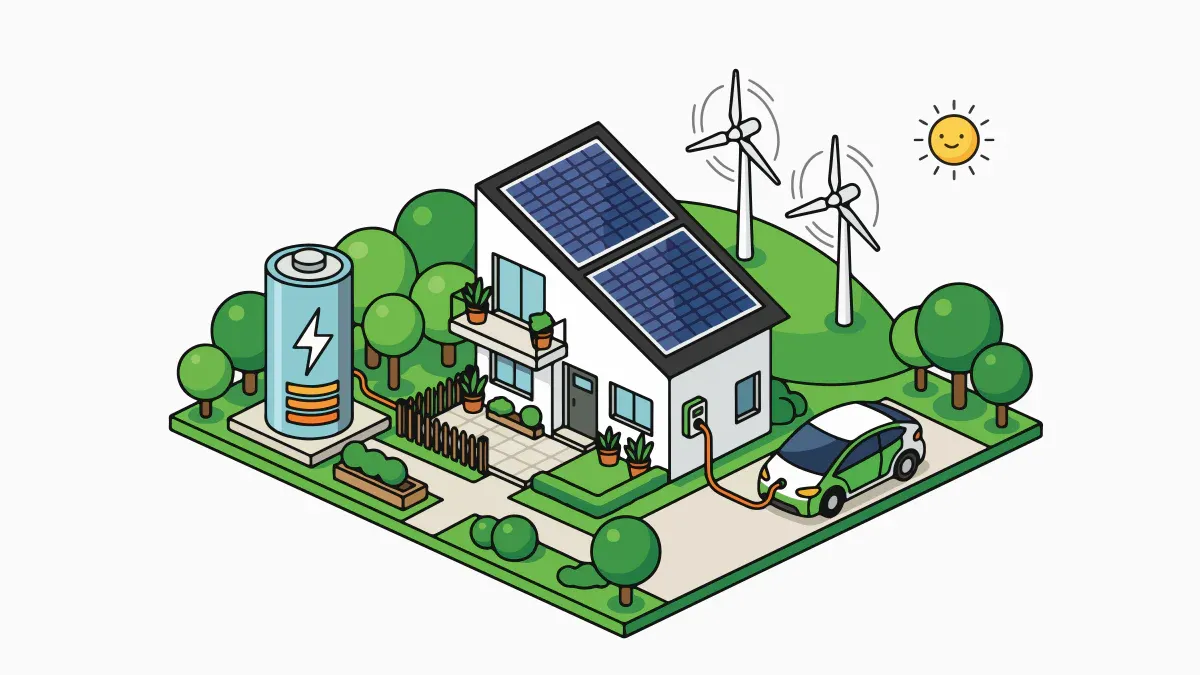
You can wire Off-Grid Solar safely if you plan each step. Choose the right parts for your system. Good wire sizing is important. Proper grounding keeps things safe. Protection devices help stop overheating and shocks. They also prevent system failure. The most common safety problems are rodent damage, moisture, corrosion, and wrong fuse or wire choices. Look at the table below to see what to watch for:
Safety Incident
Description
Rodent Damage
Rodents chew wires. This causes shorts and failures.
Moisture Management
Bad sealing traps water. This can cause shocks.
Oxidation Prevention
Inhibitors stop corrosion and voltage drops.
Grounding and Strain Relief
Good grounding lowers shock risks and damage.
Fuses of Correct Rating
Wrong fuses can overheat or start fires.
Wires of Appropriate Gauge
Small wires get hot and may start fires.
Proper Wiring Practices
Bad wiring can confuse people and cause accidents.
With clear steps, you can have safe and reliable solar wiring.
Key Takeaways
Think about your off-grid solar system before you start. Figure out how much energy you use each day. Add 20% more for extra needs later.
Pick the correct wire size so wires do not get too hot. Use thicker wires if the wires are long or if it is very hot.
Always ground your system to keep people safe from shocks. Grounding also protects your equipment from harm. Follow NEC rules to stay safe.
Use fuses and circuit breakers to keep your system safe. They help stop wires from getting too hot. They also help prevent fires.
Check your system before you turn it on. Look at all connections and grounding. Make sure wires are not damaged. This keeps your system safe.
You need to start your off-grid solar system plan by figuring out how much power you use each day. Make a list of every device and appliance you want to run with your off-grid solar system. Write down the wattage for each item and how many hours you use it daily. Multiply the wattage by the hours to get the daily energy use for each device. Add up all the numbers to find your total daily energy needs. Always add a 20% buffer for extra use or future needs. This step helps you choose the right size for your off-grid solar system.
When you pick parts for your off-grid solar system, look for safety and quality. Solar panels should meet UL, IEC, or TUV standards. Batteries need UL 1973 or UL 9540 certification. Inverters should follow UL 1741 or IEC rules. These standards make sure your off-grid solar system works safely and lasts longer.
Wire Sizing and Diagram Creation
Wire size matters in every off-grid solar system. If you use wires that are too small, they can get hot and cause fires. To choose the right wire, first find the system current by dividing power by voltage. Longer wire runs need thicker wires to stop voltage drop. Hot weather also means you may need a thicker wire. Draw a wiring diagram for your off-grid solar system. This diagram shows how each part connects. It helps you avoid mistakes and keeps your off-grid solar system safe.
Tools and PPE
You need the right tools and safety gear for your off-grid solar system. Use wire cutters, crimpers, and screwdrivers. Wear gloves and safety glasses to protect yourself. Install grounding rods and use surge protectors. Always use fuses and circuit breakers in your off-grid solar system. These steps keep you and your off-grid solar system safe from harm.
Wire Off-Grid Solar: Step-by-Step Connections
You can wire off-grid solar safely if you follow steps in order. Each step helps protect your system and keeps you safe. Good wiring stops fires, shocks, and system problems. You need the right tools and materials for every connection. Here is how you wire your off-grid solar system.
Panels to Charge Controller
First, connect your solar panels to the charge controller. This step is important for safe wiring and good energy flow. Follow these steps for a safe setup:
Connect the solar panels. For a series connection, link the positive side of one panel to the negative side of the next. For parallel, connect all positives together and all negatives together.
Make connections when panels are covered or in low light. This keeps you safe from shocks.
Use MC4 connectors for strong links. These connectors lock in place and keep out water.
Put a circuit breaker or fuse between the panels and the charge controller. This device stops electrical problems from hurting your wires.
Connect the charge controller to the battery bank before you connect the solar panels. This step helps set up the system right and stops damage.
Put a fuse or circuit breaker on the positive wire between the controller and the battery. This keeps your wires from getting too hot.
Tip: Always check if your inverter and charge controller work with your solar panels. Use the right wire size to stop wires from getting hot and losing power.
People often make mistakes like using wires that are too small, forgetting fuses, or making unsafe connections. You can avoid these problems by following these steps and using good materials.
Charge Controller to Battery Bank
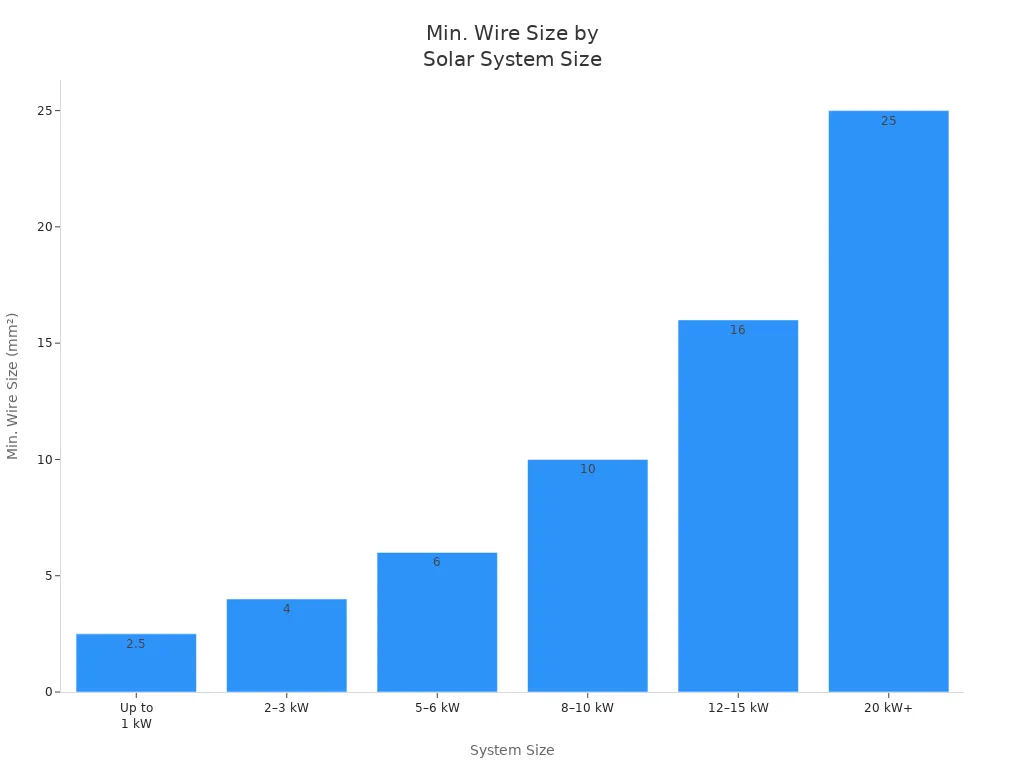
Connect the charge controller to the battery bank carefully. This step is important for safe wiring and good charging. Use the right wire size for your system. The table below shows what wire size you need for different system sizes:
System Size
Approx. DC Current (A)
Min. Wire Size (AWG)
Min. Wire Size (mm²)
Notes
Up to 1 kW
10–15 A
14 AWG
2.5 mm²
Balcony kits, small off-grid setups
2–3 kW
20–30 A
12–10 AWG
4–6 mm²
Standard starting point for most
5–6 kW
35–45 A
10–8 AWG
6–10 mm²
Most common residential system
8–10 kW
50–70 A
8–6 AWG
10–16 mm²
Check local code for conduit requirements
12–15 kW
70–100 A
6–4 AWG
16–25 mm²
Consider upsizing if run exceeds 40 ft
20 kW+
100 A+
4–2 AWG or larger
25–35 mm²+
Professional design recommended
Keep the charge controller close to the battery bank to lower voltage drop. Use a multi-meter to check voltage levels. Try to keep voltage drop at 2% or less. If you see high resistance, use a bigger wire. Plan your setup to keep wires short. This keeps your wiring safe and working well.
Note: Keep voltage drop on all DC wires below 2%. Bigger wires have less resistance and help keep voltage steady.
Battery Bank to Inverter
Connect the battery bank to the inverter with thick cables. This step is important for safe wiring and steady power. Keep cables short to lower resistance. Put a big fuse or circuit breaker on the positive wire, close to the battery. This device protects your wires if the inverter fails or there is a short.
Location
Purpose
Device Type
Between Battery Bank and Inverter
Provides catastrophic protection against inverter failure or a major short circuit.
Class T Fuse or high-amperage DC Breaker
Using the right wires helps you avoid problems like uneven charging, less reliability, and safety risks. The table below shows common risks and what they do:
Risk Type
Description
Uneven Charging/Discharging
Small battery packs may get too much current, which can cause overcharging and early failure.
Reduced System Reliability
If one battery pack fails, others can get overloaded and the whole system can stop working.
Safety Hazards
Wires can get too hot and batteries can lose power, which can make the system unsafe.
Tip: Use the thickest cables you can. Keep cables as short as possible. Put a fuse or breaker close to the battery bank.
Using Conduit and Junction Boxes
Protect your wires by using conduit and junction boxes. These parts keep wires safe from damage and weather. Conduit makes a barrier against water, sunlight, heat, and bumps. Many conduits are made to resist sunlight so they last longer. Junction boxes keep wire connections safe and neat.
Requirement
Description
DC Ground-Fault Safety Devices
Needed in above-roof combiner boxes and wiring between high-voltage modules to lower arcing risks.
Safety Disconnect Location
Must be labeled and placed near the electric meter so emergency workers can find it fast.
Grounding Systems
AC and DC systems must be grounded separately, with special rules for inverters and metal boxes.
Material Specifications
Use dielectric connectors for grounding aluminum parts to stop electrolysis.
Breaker Types
AC and DC breakers are not the same; using the wrong one can cause fires.
Use UL-certified parts for your setup. Label safety disconnects clearly to help emergency workers. Conduit and junction boxes help keep wires safe and working well, even when the weather changes.
Conduits keep water out of wires, which is important in rainy or humid places.
They insulate wires and help keep them cool.
Junction boxes keep wires organized and make repairs easier.
Safety Alert: Electrical shorts in long wires can be dangerous. Always use conduit and junction boxes to keep your wires safe.
You make your off-grid solar system safer and last longer by following these steps. Good wiring, the right protection devices, and strong connections keep your system working well.
Protection and Grounding
System Grounding (Single Ground Rod)
You need to ground your off-grid solar system to keep it safe. Grounding stops electric shock, equipment damage, and fires. Some people skip grounding, but it is very important. If you do not ground your system, you could get shocked or your system could break. Ground faults can make arc flashes, which are dangerous for anyone working nearby.
You should follow the National Electrical Code (NEC) rules for grounding. First, check what kind of soil you have and how wet it is. Pick a grounding method, like ground rods, ground rings, or mounting poles. Hammer a ground rod at least 8 feet deep into the ground. Use copper or galvanized steel for the rod. Connect all metal parts of your system to the ground rod with good copper wire. Keep these wires as short as you can. Try to get a resistance lower than 5 ohms. Use an earth resistance meter to test your work. If the resistance is too high, change your setup. Write down how you installed everything for later.
Tip: NEC sections 250.50 and 250.52 say you need a grounding electrode system. Most ground rods are copper-clad steel, 5/8 or 3/4 inch wide, and 8 or 10 feet long.
Good grounding lowers shock risks and keeps your equipment safe. It also follows the rules and helps stop fires.
Fuses and Circuit Breakers
You need fuses and circuit breakers to keep your off-grid solar system safe from electrical problems. Fuses melt if too much current flows, which breaks the circuit and stops damage. You have to put in a new fuse after it blows. Circuit breakers turn off by themselves when there is too much current and you can turn them back on. Fuses work faster, so they are good for battery connections. Circuit breakers make fixing things easier.
You should put fuses and circuit breakers in important spots:
Panel-to-controller fuse stops panel short circuits.
Controller-to-battery fuse protects the battery bank and controller.
A good rule is to use a breaker that is 1.2 times the highest current. For example, if you have two 100W panels at 12V, the current is 16.7A. You should use a 20A breaker. For the inverter, think about surge loads. A 2000W load needs a 200A breaker. Renogy says to use a 100A fuse between the battery and inverter for safety.
If you do not use fuses or circuit breakers, you could get overheating, fires, or broken equipment. You must fuse the solar array if the short circuit amperage is higher than the panel’s max series fuse rating. Circuit breakers can find overloads and short circuits. They stop power right away and keep small problems from getting worse.
Safety Alert: Always use the right fuse and breaker size for your system. This step is very important for safety.
Surge Protection Devices
Surge protection devices (SPDs) protect your off-grid solar system from sudden voltage spikes. Surges can happen fast or slowly. They can hurt your equipment and make it not last as long. Inverters are easy to damage. Surges can break power semiconductors, mess up logic boards, and make the system fail. You might lose energy and have to pay for repairs.
There are three types of SPDs. The table below shows what they do:
SPD Type
Characteristics
Voltage Protection Level
Installation Location
Cost Range
Type 1
Handles direct lightning current with high discharge capacities.
2.5-4.0kV for 600V DC systems.
Service entrance panel, main distribution board.
$200-$800
Type 2
Protects against conducted surges with moderate discharge capacities.
1.8-3.0kV for 600V DC systems.
Distribution boards, critical equipment locations.
N/A
Type 3
Provides extra protection at the equipment level.
N/A
Near sensitive equipment.
N/A
Surge protection saves you money over time. For a home system, there is a 20% chance of a damaging surge in 25 years. The average damage costs $4,500. The expected loss is $900. Surge protection costs $600, so you save $300. For a business system, you save even more.
Note: Surge protection devices help stop energy loss, lower repair costs, and keep your system working longer.
You must use grounding, fuses, circuit breakers, and surge protection to keep your off-grid solar system safe. These steps protect you, your equipment, and your money.
Commissioning Your Off-Grid Solar Power System
Safety Checklist Before Power-Up
Before you turn on your off-grid solar power system, you need to check every part for safety. This step helps you avoid problems and keeps you safe. Use this checklist to guide your final inspection:
Check every electrical connection for tightness. Loose wires can cause heat and fires.
Use a multimeter to verify the polarity of each connection. Wrong polarity can damage your equipment.
Inspect all wires for cuts or exposed copper. Replace any damaged wires before you continue.
Confirm that your grounding wire connects well to the ground rod. Good grounding protects you from shocks.
Review your wiring diagram to make sure every part matches your plan.
You should also look for common mistakes. Many people forget to secure cables or use the wrong connectors when wiring the solar panels. Make sure all labels are clear and easy to read. Check that all enclosures are in good shape and that connections are not loose. If you see any cracks or hot spots on your solar modules, use thermal imaging to find hidden problems.
Tip: Good wire management and clear labeling make future repairs easier and safer.
Sequential Power-Up Steps
When you finish installing solar panels and wiring the solar panels, you need to power up your diy off-grid solar system in the right order. This order protects your equipment and helps you spot problems early.
Turn on the circuit breaker between the charge controller and the battery bank. The charge controller should light up.
Switch on the breaker from the solar panels to the charge controller. You should see the controller start to show power from the sun.
Turn on your inverter last. This step lets your off-grid solar power system start sending power to your devices.
If you notice any issues, such as batteries not holding a charge or uneven charging, check your wiring diagram and connections again. Make sure your batteries have good airflow and clean terminals. Regular checks help you keep your diy off-grid solar system running well and protecting the system for years.
Note: Always follow your wiring diagram and safety checklist before you power up your off-grid solar power system. Careful steps prevent damage and keep your diy project safe.
You can keep your off-grid solar wiring safe if you follow each step. Always pick the right wire size for your system. Make sure to ground your system and add protection devices. Check your work two times to catch mistakes. If the job is hard, ask a licensed electrician for help. The table below shows why these steps are important:
Key Practice
Importance
Proper wiring
Keeps your home and family safe
Correct wire sizing
Stops wires from getting hot or losing power
Professional consultation
Makes sure your system works well for years
When you wire your system the safe way, you get steady power. You also spend less money fixing things and feel calm knowing it is safe.
FAQ
What is a battery bank in an off-grid solar system?
A battery bank stores energy from your solar panels. You use a battery bank to keep power for times when the sun does not shine. The battery bank lets you run devices at night or on cloudy days. You connect batteries together to make a battery bank.
How do you connect batteries to build a battery bank?
You connect batteries in series or parallel to build a battery bank. Series connections increase voltage. Parallel connections increase capacity. Always use the same type and size of batteries in your battery bank. This helps your battery bank work well and last longer.
Why do you need a battery bank instead of just one battery?
A battery bank gives you more power than a single battery. You need a battery bank to store enough energy for your needs. One battery cannot hold as much energy as a battery bank. Using a battery bank helps you run more devices and have backup power.
How do you keep your battery bank safe?
You keep your battery bank safe by using fuses, circuit breakers, and good wiring. Always check your battery bank for leaks or damage. Keep your battery bank clean and dry. Use the right size wires for your battery bank. Never mix old and new batteries in your battery bank.
How often should you check your batteries and battery bank?
You should check your batteries and battery bank every month. Look for signs of wear or leaks in your battery bank. Test the voltage of your batteries. Clean the battery bank terminals. Make sure your battery bank stays dry and cool. Replace damaged batteries in your battery bank right away.
Tip: A well-maintained battery bank with healthy batteries gives you steady power and keeps your system safe.

 Español
 Deutsch
 italiano
 Nederlands
 English
 Français
 Português
 日本語
日本語 한국어
한국어 Tiếng Việt
 ไทย
ไทย Türkçe
 ဗမာစာ
ဗမာစာ Filipino
 Bahasa Indonesia
 magyar
 Српски
 हिन्दी
 فارسی
فارسی Slovenčina
 Slovenščina
 Norsk
Norsk Svenska
 українська
 Ελληνικά
 Հայերեն
 Dansk
Dansk Shqip
Shqip বাংলা
বাংলা Hrvatski
 Gaeilge
 Eesti keel
 Oʻzbekcha
 latviešu
 Azərbaycan dili
 Беларуская мова
 Български
 ქართული
 ʻŌlelo Hawaiʻi
 Kinyarwanda
 Кыргызча
 Oluganda
 Lëtzebuergesch
 Cymraeg