When you wire solar panels at home, you can use series, parallel, or both. This choice changes your system’s voltage and current. Your solar panel wiring must fit your inverter’s voltage range and power level. If you do not match the wiring or string size, your system may not work well. You could also have equipment problems. Careful wiring keeps your solar setup safe. It helps your solar panel system work well. A good setup makes your home energy steady.

Solar Panel System Basics
Key Concepts
When you learn about solar energy systems, you need to know some basic electrical ideas. These ideas help you pick the right solar panel setup for your house.
Voltage is the push that moves electricity in wires. Sunlight changes how much voltage your panels make.
Current is how electricity flows. You measure current in amperes.
Power shows how much energy your system makes. You get power by multiplying voltage and current.
Series configuration links panels one after another. This setup raises voltage but keeps current the same. If one panel is shaded, the whole string loses power.
Parallel configuration joins all positive wires together and all negative wires together. This setup raises current but keeps voltage the same. Shading only affects the shaded panel.
Hybrid configuration mixes series and parallel wiring. You use this when you want to balance voltage and current.
You need to match your solar panel setup to your inverter’s voltage and current limits. This step keeps your system safe and working well.
Inverters with MPPT technology change voltage and current to get the most power from your panels.
Tip: Always read your inverter’s manual before picking a solar panel setup. This helps you avoid problems and keeps your system working well.
Main Components
A solar panel system has many parts that work together to turn sunlight into electricity you can use. Here is a table that lists the main parts and what they do:
| Component | Function | Importance |
| Solar Panels | Change sunlight into DC electricity | Main source of solar energy |
| Inverter | Change DC electricity to AC for home use | Makes power usable in your house |
| Solar Battery | Store extra energy for later use | Gives backup during outages |
| Charge Controller | Protect batteries from overcharging | Extends battery life |
| Disconnect Switch | Lets you safely turn off the system | Needed for safety and maintenance |
| Racking & Mounting | Hold panels in place and at the right angle | Keeps panels secure and efficient |
You might also see other parts like anti-reflective coatings, sealants, and interconnectors. These help your system work better and last longer.
Note: Most homes use monocrystalline or polycrystalline panels. Monocrystalline panels work better and last longer, but polycrystalline panels cost less.
Solar Panel Wiring Methods
When you plan your solar panel wiring, you must pick the right setup. The way you wire solar panels changes how much voltage and current you get. Each way to connect solar panels has good and bad points. You can look at a solar panel wiring diagram to help you choose.
Series Solar Panel Wiring
Series solar panel wiring means you connect the positive end of one panel to the negative end of the next. This adds up the voltage from each panel, but the current stays the same. If you connect four solar panels in series, you add their voltages together. This is good if you want higher voltage and lower current. Many people use series solar panel wiring for long wires because it helps stop power loss.
| Wiring Method | Voltage Output | Current Output | Explanation |
| Series | Sum of individual panel voltages (e.g., 4 panels × 40V = 160V) | Same as a single panel (e.g., 10A) | Panels are linked end-to-end. Voltage adds up, current stays the same. Good for long wires. Shading can lower power for all panels. |
Pros and Cons of Series Solar Panel Wiring:
| Aspect | Advantages | Disadvantages |
| Voltage Output | Makes more voltage without needing bigger wires or new gear | - |
| Cost Efficiency | Saves money and time by using what you have | - |
| Circuit Reliability | - | If one panel is shaded or broken, the whole circuit stops working |
Use series solar panel wiring when all panels face the same way and get full sun. If one panel gets shade, the whole string loses power. Always check your solar panel wiring diagram to make sure you do it right.
Parallel Solar Panel Wiring
Parallel solar panel wiring means you connect all the positive ends together and all the negative ends together. This keeps the voltage the same as one panel but adds up the current. If you connect four solar panels in parallel, you get the same voltage as one panel but four times the current. Parallel solar panel wiring is good if you have shade or panels in different spots.
| Wiring Method | Voltage Output | Current Output | Explanation |
| Parallel | Same as a single panel (e.g., 40V) | Sum of individual panel currents (e.g., 4 panels × 10A = 40A) | Panels are joined positive to positive and negative to negative. Current adds up, voltage stays the same. Good for shade but needs thicker wires. |
When to Use Parallel Solar Panel Wiring:
You have some shade on your roof.
You want lower voltage for safety.
You use battery systems like 12V or 24V.
Benefits of Parallel Solar Panel Wiring:
Each panel works by itself, so shade only hurts one panel.
You get more current, which helps run big things.
You can put panels in different spots or angles.
Parallel solar panel wiring needs thicker wires because of the higher current. Always use a solar panel wiring diagram to plan your parallel solar panel connection.
Hybrid Wiring
A hybrid solar panel setup uses both series and parallel wiring. You connect panels in series to make strings, then join those strings in parallel. This lets you balance voltage and current for your inverter. Hybrid solar panel wiring gives you more choices and makes your system stronger.
| Wiring Method | Voltage Output | Current Output | Explanation |
| Hybrid (Series-Parallel) | Mix of series and parallel voltages to fit your system (e.g., many series strings joined in parallel) | Mix of series and parallel currents to fit your system | Used in big setups to balance voltage and current for the inverter. Gets the good parts of both ways. |
Why Choose a Hybrid Solar Panel Configuration?
You can use many types of inverters.
Shade or damage only hurts one string, not the whole system.
You can add more strings to make your system bigger.
You lose less power in wires and still get good results if one string is weak.
Hybrid solar panel wiring is common in bigger home systems. Always check your solar panel wiring diagram before you wire solar panels in a hybrid setup.
Microinverters and Optimizers
Microinverters and power optimizers change how you wire solar panels. Microinverters go on each panel and turn DC into AC right away. This lets you add more panels later and works well for roofs with shade or different angles. Power optimizers go on each panel and help each one make the most power, even if some have shade or dirt.
Microinverters let you see how each panel is working and make wiring safer by removing high DC voltage strings.
Power optimizers work with a central inverter and help you get more energy from each panel.
Both let you find problems fast and keep your solar panel connection strong.
Microinverters make it easy to add more panels later. Power optimizers cost less at first but still help your system work better.
You can use microinverters or optimizers with any solar panel setup, like series, parallel, or hybrid. These devices help you get the best from your solar panel wiring, no matter how your roof looks.
System Design and Planning
Inverter Compatibility
Your solar panel wiring must fit your inverter’s voltage and current limits. Always look at the inverter’s manual and check charts before you start. Series wiring makes voltage go up. Parallel wiring makes current go up. Your inverter needs to handle all the voltage and current from your panels. Many inverters use MPPT zones to get the most power from each string. Microinverters and power optimizers help each panel work well, even if some get shade or face different ways.
Tip: Make sure your dc wiring matches the inverter’s input range. This keeps your system safe and working well.
Wire Sizing and Safety
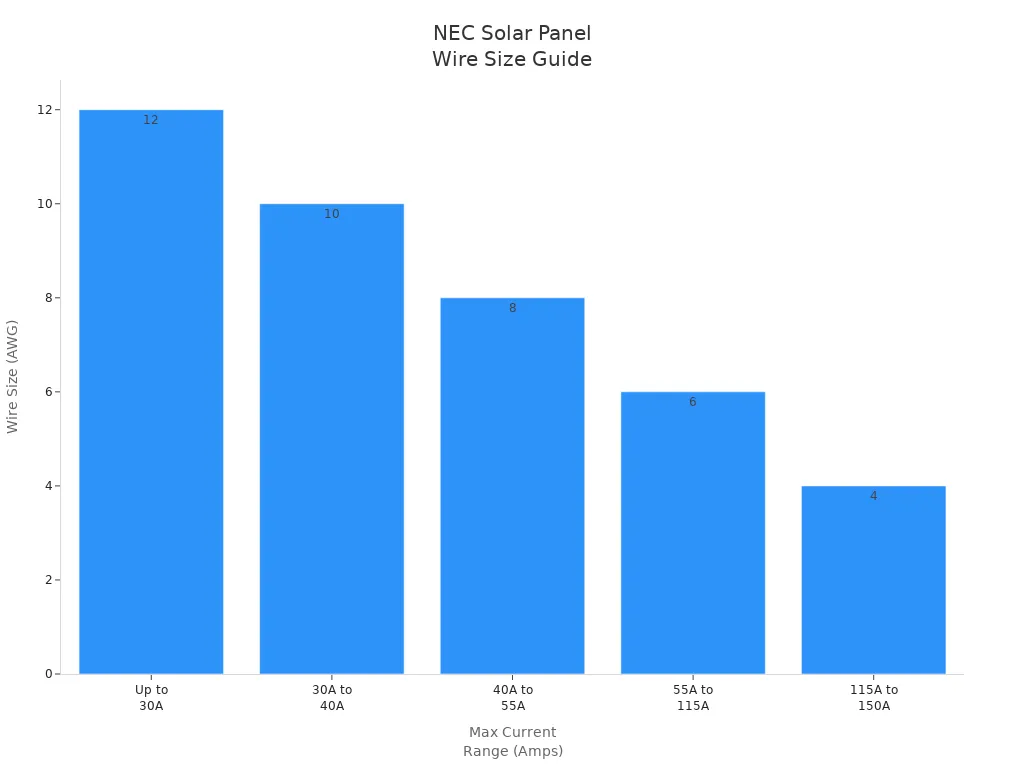
Picking the right wire size is important for safety and good performance. The National Electrical Code (NEC) has rules for wire sizing. You need thicker wires for more current or longer wires. This stops voltage drop and wires getting too hot. Here is a table to help you choose the right wire size:
| Maximum Current Range (Amps) | Recommended Wire Size (AWG) | Notes |
| Up to 30A | 12 AWG | For solar arrays with max current ≤ 30A |
| 30A to 40A | 10 AWG | For arrays producing between 30A and 40A |
| 40A to 55A | 8 AWG | For arrays producing between 40A and 55A |
| 55A to 115A | 6 AWG | For higher current systems |
| 115A to 150A | 4 AWG | For very high current systems |
![Bar chart showing recommended wire sizes for solar panel system current ranges per NEC.]()
Note: Always use UL-certified copper wires with good insulation for your solar system.
Shading and Expansion
Shade can lower your system’s power. Even a small shadow can cause big drops, especially with series wiring. Bypass diodes, microinverters, or power optimizers help each panel work alone. Before you install, look for trees, chimneys, or things that block sunlight. Trim trees and put panels where they get the most sun. If you want to add more panels later, leave space and pick inverters and mounts that let you expand. New solar tech, like high-efficiency panels and smart layouts, make upgrades easier.
Check how much energy your home uses now and later.
Choose panels and inverters that let you add more.
Use smart monitoring to watch how your system works.
Code Compliance
You must follow NEC and local codes when you put in solar panels. These rules keep your system safe and help you pass checks. Here are some key rules:
| Code Requirement | What It Means | Why It Matters |
| Article 690 | Main rules for solar PV systems | Covers grounding, wire sizing, and shutdown |
| Article 250 | Grounding and bonding | Stops electric shock and fire |
| Article 705 | Connecting to the grid | Makes utility connections safe |
| Rapid Shutdown | Fast voltage drop in emergencies | Keeps firefighters safe |
| Arc-Fault Protection | Stops fires from wiring problems | Keeps your home safe |
Always use approved connectors and follow fire and building codes for your area. Work with a licensed installer to make sure your system meets all rules.
Step-by-Step Wiring Solar Panels
Wiring solar panels takes planning and care. You need to follow steps to keep things safe. This guide shows you how to wire solar panels at home. You start with checking your needs and finish with safety checks.
Assessing Needs
First, figure out what your home needs. Check which way your roof faces and how much it tilts. Panels work best if they face true south or true north. Look for things like trees or chimneys that make shade. Measure your roof to see how many panels fit. Check how much energy your family uses. Think about adding more panels in the future.
Tip: Checking your site helps you pick the best setup and avoid problems.
Choosing Configuration
Pick the wiring method that fits your system. Use series wiring if you want more voltage. Choose parallel wiring for more current or if you have shade. Pick hybrid wiring if you need both voltage and current or have a big system.
| Configuration Type | When to Use | Main Benefit |
| Series | Panels get full sun, inverter needs high voltage | Simple wiring, less power loss over long wires |
| Parallel | Some panels get shade, need more current | Each panel works independently, safer voltage |
| Hybrid | Large systems, mixed conditions | Combines benefits of series and parallel |
Always match your wiring to your inverter’s voltage and current limits. This keeps your system safe and working well.
Gathering Tools
Get all your tools and supplies before you start. You need wire strippers and cutters for the cables. Use crimping tools to make strong connections. A multimeter checks voltage, current, and if wires connect. Wear gloves, glasses, a hard hat, and a harness for safety. Have a fire extinguisher nearby. Use MC4 connectors for strong connections. You also need junction boxes, switches, and cable ties. Pick wires that are strong and can handle sunlight. See more information about wires and cables.
Note: Always use tools that are safe and made for solar work.
Planning Layout
Plan where your panels and wires will go. Draw a simple diagram to show where everything is. Put panels with the same tilt and sun together in one string. Keep wires short to stop power loss. Use the right wire size for the distance and current. Protect wires in pipes and do not bend them too much. Put switches and boxes where you can reach them.
Good planning helps you avoid mistakes and keeps your wiring neat.
Making Connections
Now you can connect your solar panels. First, attach each panel to the rails with clamps. For series, link the positive of one panel to the negative of the next. For parallel, connect all positives together and all negatives together. For hybrid, make series strings first, then join those in parallel. Use MC4 connectors for every connection. Never connect or disconnect MC4 connectors when the system is on. Run DC cables through the roof or attic, keeping them under 15 meters. Add junction boxes and switches for safety. Connect the array to the charge controller, then to the battery, and finally to the inverter. Label all wires so you know what they are.
Always turn off breakers and lock out power before you work on wires.
Testing and Verification
After wiring, test every connection for safety. Look at all wires and boxes for damage or loose parts. Use a multimeter to check voltage and make sure wires are right. Use a clamp meter to check current for each panel or string. Test if wires connect all the way through. Check insulation to make sure there are no leaks. Use a GFCI to test grounding. If you can, use a thermal camera to find hot spots. Label everything and keep notes for later.
Testing keeps your system safe and helps you find problems early.
Grounding and Fusing
Grounding and fusing are very important for safety. Ground all metal parts with the right wires and rods. Use fuses or breakers that fit your system’s voltage and current. Pick wires that do not burn and can handle sunlight. Put switches where you can reach them fast. Label all wires and parts for easy finding. Follow rules for fast shutdown to keep people safe in a fire.
| Aspect | Best Practice / Requirement | Benefit |
| Grounding | NEC-compliant grounding conductors and electrodes | Reduces shock and fire risk |
| Overcurrent Protection | Fuses or breakers sized for system | Protects wiring and equipment |
| Wiring Materials | Fire- and UV-resistant, correct gauge | Prevents faults and hazards |
| Disconnects | Accessible shutdown switches | Emergency safety |
| Labeling | Clear labels and documentation | Easier maintenance |
Good grounding and fusing keep your wiring safe and help you pass checks.
If you follow these steps, you can wire solar panels safely. Always use the right tools and double-check every connection. Follow all safety and code rules. This way, your solar system will give you clean energy for a long time.
Troubleshooting and Maintenance
Common Mistakes
You can stop many solar panel problems if you know what to avoid. If you skip checks after installing, you might miss wiring problems. Always ask your installer to check everything after setup. Using cheap wires or not making tight connections can waste energy and cause danger. Wires with broken covers or wires you can see might cause ground faults or fires. Keep all wires safe from weather and animals. Here are some mistakes you should watch for:
Using weak or indoor-only wires
Leaving wires loose or not covered
Not fixing broken wire covers or bare wires
Not protecting wires from sun, rain, or animals
Tip: Always hire trained workers for setup and repairs. Turn off your system before you touch any wires.
Performance Checks
Checking your solar system often helps it work well. Look for cracks, chips, or wires you can see on your panels. Clean your panels two to four times each year to get rid of dirt. Cut tree branches and move things that make shade. Use a monitoring app or screen to watch your system’s power. If you see power drop fast, look for problems right away. Check your inverter often because it is very important and can break.
Clean your panels every 6 to 12 months with soft tools.
After storms, look for dirt, shade, or broken parts.
Watch your system every week for drops or warnings.
Make sure the inverter has air and its lights work.
Write down all the work and fixes you do.
Keeping panels clean and checking your system helps you get more energy and keeps your system safe.
Regular Inspection
Check your solar system at least once a year. Plan for a pro to check your panels, wires, and inverter. The technician will look for hidden problems and test how well your system works. Use tools to watch your system every day and find problems early. After bad weather, look for loose wires, broken panels, or dirt. You need maintenance if you see big power drops, broken parts, dirty panels, or inverter errors.
Plan checks for each season, especially after winter or storms.
Use drones or heat cameras for big systems.
Fix any problems as soon as you see them.
Regular checks keep your solar system safe, working well, and lasting longer.
Picking the best way to wire your solar panels helps you get more energy. Your system stays safe and works well if you match the wiring to your inverter and follow all rules.
The right setup lets you add more panels later. It also makes fixing things easier and keeps your power steady, even if one panel is in shade.
If you take care of your panels, they can last 25 to 30 years. They only lose a little bit of power each year.
If your setup is tricky, use special tools or ask a trained expert. Training classes and certificates, like NABCEP or SolarEdge, help you do the job right.
FAQ
How do you know if you should wire solar panels in series or parallel?
Check your inverter’s voltage and current limits first. Series wiring is good for higher voltage and long wires. Parallel wiring is better if you have shade or want lower voltage. Always make sure your setup fits your inverter’s needs.
Can you mix different solar panel brands or sizes in one system?
It is best not to mix brands or sizes. Different voltages or currents can make your system work worse. If you must mix, use separate strings or microinverters for each kind.
What happens if one solar panel gets shaded?
If one panel in a series string has shade, the whole string loses power. In parallel, only the shaded panel loses power. Microinverters or optimizers help each panel work better, even with shade.
Do you need a professional to wire solar panels?
You should hire a professional for most solar panel jobs. Professionals know safety rules and local codes. They make sure your system works well and passes inspection. Doing it yourself can be risky if you do not have experience.