You want your PV system to work well. Many problems inside can hide from your eyes. These problems can make your system work worse. You may not see any clear warning signs. Module EL Inspection lets you see inside each panel. Look at how this method compares to regular checks:
| Method | Detection Capabilities |
| Electroluminescence | Finds small problems and microcracks very well. |
| Visual Inspection | Misses many problems and only finds big flaws. |
This way helps you find hidden damage early. It keeps your system working well. You can plan for long-term success. You will learn easy steps to use this inspection in your daily work.

Key Takeaways
Module EL Inspection helps you find problems that normal checks miss. It lets you spot issues early. This keeps your system working well.
EL inspection can save you money. It finds small problems before they get worse. Fixing them early stops expensive repairs later.
This method lets you check each module’s health. You do not damage the modules. You can look for microcracks and other defects safely.
Add EL inspection to your yearly maintenance plan. Regular checks help keep energy output high. They also help your PV system last longer.
EL inspection gives proof for warranty claims. If you find defects early, you can show proof with documents.
EL Inspection Basics
How It Works
Electroluminescence (EL) inspection helps you look inside PV modules. You do not need to take the modules apart. This method uses a special effect called electroluminescence. When you put a certain voltage on a PV module, the cells glow with a weak light. Special cameras can see this light. The module does not get damaged during the test. EL inspection shows you how healthy the module is. It helps you find problems early.
EL inspection is special because it does not harm the module. You can check each module’s condition safely. You see things that normal visual checks cannot show. This makes EL inspection very useful for people who want their PV systems to work well.
Unique Capabilities
EL inspection helps you find hidden defects you cannot see with your eyes. These defects can make your system work worse or even break it. Here is a table that shows what EL inspection can find:
| Defect Type | EL Image Characteristics | Physical Cause | Potential Impact |
| Microcracks | Linear or branching dark lines | Mechanical or thermal stress | Power loss, risk of hot spots |
| Edge Ribbon Cracks | Dark lines along cell edges | Shipping, installation, or new tech stress | Reduced output, long-term failure |
| Gridline Breaks | Discontinuous grid patterns | Manufacturing defects | Lower current collection |
| Black Core/Black Spots | Dark patches in cell areas | Material impurities or contamination | Local power loss |
| Moisture Ingress | Uneven brightness, dark zones | Water entry, corrosion | Degradation, reduced lifespan |
| Hot Spots | Bright local areas | Current mismatch, shading | Accelerated aging, fire risk |
Most PV modules have microcracks, moisture problems, corrosion, and other issues. Some modules also show signs of optical changes and temperature problems.
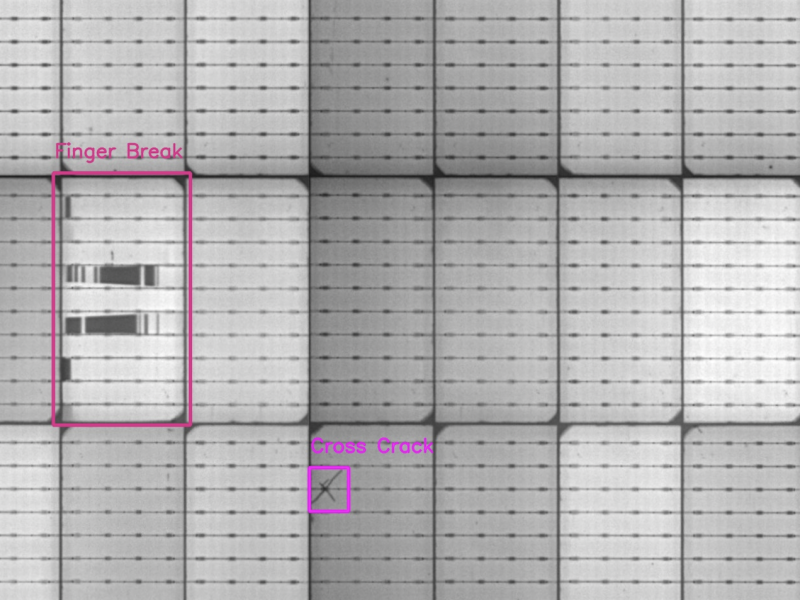
You can also find new cracks, like edge ribbon cracks, in newer modules. These cracks can happen during shipping or when installing the modules. EL inspection helps you find these problems before they get worse. This keeps your PV system safe and working well.
![finger-break-cross-crack]()
Hidden Issues in PV Modules
Microcracks and Cell Damage
You might not see microcracks in your modules at first. These small cracks hide inside the cells. EL inspection helps you spot these hidden problems. Many modules have microcracks that normal checks do not find. Studies show some cracks are easy to miss:
Regular EL and PL methods only find about 67–84% of cracks.
Up to 33% of cracks stay hidden, even after careful checks.
Microcracks can start tiny but get bigger over time.
Finding microcracks is important for checking solar panel damage. If you ignore these cracks, you risk more than just a little power loss. Microcracks make the cells resist electricity more. This extra resistance can cause hot spots and hurt the module. You might see your panels make less power. The table below shows how microcracks and cell damage can hurt your modules:
| Impact Type | Description |
| Increased Resistance and Thermal Damage | Microcracks make it harder for electricity to flow, which heats up the cells and causes hot spots. This can damage the module. |
| Reduced Power Output | More resistance means your solar panel makes less power and works less well. |
| Crack Propagation and Module Failure | Microcracks can grow into bigger cracks. This can stop your panel from working and you may need to replace it. |
Tip: If you find microcracks early, you can avoid hot spots and sudden panel failure.
PID and Shunts
Potential-induced degradation (PID) and shunts are other hidden problems that can hurt your modules. PID happens when voltage stress makes electricity leak in the cells. This makes power drop fast. Shunts give electricity a path it should not take, so your modules make less power. Both problems can cause hot spots and make your panels fail sooner.
You should check for PID and shunts every time you inspect. EL images help you see these problems before they get worse. If you find them early, you can fix or change the bad modules. This keeps your system safe and your power steady.
Module EL Inspection Benefits
Early Detection
You want your solar system to last a long time. You also want it to make as much energy as possible. Module EL inspection helps you find problems early. This method lets you look inside the modules. You can spot hidden defects like microcracks, cell fractures, and soldering faults. Regular checks often miss these issues. If you do not catch them, you can lose power or get hot spots. Sometimes, the whole module can fail.
Module EL inspection works like an early warning system. You can see problems before they get worse.
You stop sudden power loss and keep your modules working well.
You lower the chance of hot spots that can hurt your modules.
You save money by fixing small problems before they grow.
Using module EL inspection also helps you spend less on repairs. You do not have to wait for a big problem to show up. You can plan repairs and avoid long breaks. This keeps your energy high and your system running well.
Tip: If you find problems early with module EL inspection, you only fix the modules that need it. You do not waste time or money on good modules.
You also get proof for warranty claims. If you find microcracks or other defects early, you can show the manufacturer pictures. This helps you get help or new modules faster. Many owners have saved a lot of money by using module EL inspection for their claims.
Reliability Over Traditional Methods
You want good results when you check your photovoltaic modules. Module EL inspection gives you more details than just looking or using infrared cameras. Here is a table that shows how each method works:
| Inspection Method | Strengths | Limitations |
| Visual Inspection | Finds problems you can see, like yellowing or cracks. | Misses hidden defects inside modules. |
| Infrared Thermography | Spots hot spots and thermal stress. | Cannot find all types of cell damage. |
| Module EL Inspection | Detects microcracks, cell fractures, and hidden defects. | Needs special cameras and dark conditions. |
Module EL inspection uses special cameras to see weak light from the cells. You need to test in the dark, which can be hard for big solar farms. Sometimes, you must check at night or cover the modules. The equipment costs more than just looking, but you get better results. You see the quality and health of each module.
You can use module EL inspection to pick which modules need to be replaced or checked more. Here is how it works:
You scan the modules and find hidden damage like microcracks.
The images show how bad the damage is, so you can decide what to fix.
You sort the modules into groups: healthy, damaged, or needing more checks.
You spend your time and money on the modules that need it most.
This method helps you plan repairs before things break. You can use the data from module EL inspection to see patterns and plan ahead. Some systems use AI to look at the images and find problems. This helps you keep your photovoltaic modules working well for a long time.
Module EL inspection also helps you test new modules before you use them. You can check them after storms or other events too. This keeps your system safe and your energy high.
Note: Things like moisture, heat, or sand can change the results. Always check the conditions before you start your inspection.
Module EL inspection lets you check your modules without taking them apart. You get fast, clear results that help you stop power loss and failure. This makes module EL inspection the best choice for people who want strong, high-quality photovoltaic modules and good system performance.
Workflow Integration
Step-by-Step Process
You can add EL inspection to your normal checks. This helps your modules work well and make more power. Plan to do EL inspection every year as part of your maintenance. Make it the last step in your project to help you succeed. Here are some easy steps to follow:
Look at your maintenance plan and add EL imaging for all modules.
Get your site ready by checking for dangers and making sure you have enough time.
Use EL cameras to check each module. Try to find problems like microcracks or hidden cell damage that other checks miss.
Work with your team to look at the images. Watch for things that could lower power or hurt quality.
Put modules into groups: healthy, damaged, or ones that need more checks. This helps you know which ones to fix or watch.
Write down what you find and change your maintenance plan if needed. Doing EL inspection often keeps your system strong and working for a long time.
EL inspection works even better when you use it with other checks, like infrared scans. This way, you see how good your modules are and how much power they make.
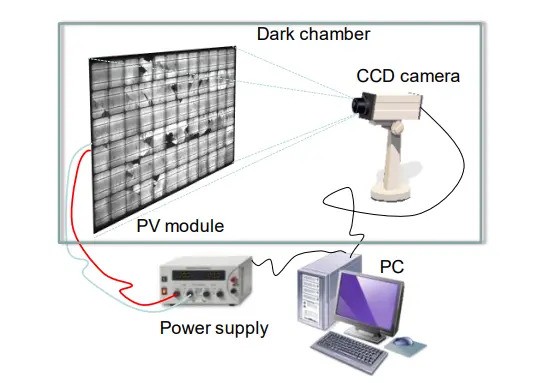
![EL inspection setup for solar module testing]()
Tools and Safety
You need the right tools to do EL inspection safely and well. The table below shows what you should use:
| Equipment Type | Description |
| EL Cameras | Take pictures of electroluminescence from modules. |
| Imaging Systems | Help you look at image details for problems. |
| DC Power Supply | Gives voltage to modules during the check. |
| Tripod/Framing System | Makes taking pictures easier, but not always needed. |
| Drones | Help you check hard-to-reach modules fast and better. |
| CMOS Cameras | Need more time to take pictures and are less sensitive to EL light. |
| InGaAs Cameras | Give great pictures and work best for EL inspection. |
Safety is very important for every check. Follow these rules:
| Best Practice | Description |
| Hazard Identification | Find dangers at your solar plant to stop accidents. |
| Proper Planning | Plan each step to keep everyone safe. |
| Compliance with Regulations | Follow safety rules to protect workers and others. |
You should also get good training. Classes like Certified PV System Inspector or NABCEP PV Installation Professional Certification teach you how to check modules and keep power high.
Tip: Always check your tools before you start. Good planning and training help you find problems early and keep your modules working for many years.
If you use module EL inspection first, your PV system works better. EL imaging lets you find cracks and bad soldering. It also helps you spot hidden problems early. You can see snail trails and check if power stays steady. This keeps your energy output safe. The table below explains why EL inspection is a smart first step for good results over time.
| Reason for EL Inspection | Description |
| Detection of Cracks | EL testing finds cracks that lower performance. |
| Alternative Method | EL gives special details that regular checks miss. |
FAQ
What is the main benefit of EL inspection for photovoltaic systems?
EL inspection helps you find hidden problems in photovoltaic modules. Normal checks can miss these issues. Finding them early keeps your system healthy. Your photovoltaic system will work well for a long time.
How often should you perform EL inspection on photovoltaic modules?
You should do EL inspection once every year. You can also check after storms or if power drops. This helps keep your photovoltaic system safe and working.
Can EL inspection help you decide which photovoltaic modules to replace?
Yes. EL inspection shows which modules have cracks or damage. You can replace only the bad modules. This saves money and keeps your system strong.
What equipment do you need for EL inspection of photovoltaic modules?
You need an EL camera and a DC power supply. Make sure your work area is safe. Some people use drones for big sites. Always check your tools before starting to keep modules safe.
Does EL inspection improve the long-term operation of photovoltaic systems?
Yes. EL inspection helps you find problems early in modules. You can fix them before they get worse. This keeps your system working well for a long time.
Tip: Doing EL inspection often helps you avoid big repairs. It keeps your photovoltaic modules making power for many years.